Monday, December 17, 2012

Canine CutUps Decorative Paper Art


The perfect Holiday gift for the dog-obsessed person in your life. I give you: Canine CutUps.


A few weeks ago I stumbled upon this Etsy shop and rather than dropping forty big ones, decided to put my crafty skills to the test. DIY, onward!

Time: 1 hour
Cost: Less than $5 (not including the frame)

TOOLS & SUPPLIES
5-6 sheets of decorative paper
Dog template
Scissors
Exacto knife
Cutting board
Glue stick

STEPS
1. Find your dog template. To make things easier (read: cheat) I simply printed off the breeds I wanted from the original Etsy shop that way the fur and muscle shading was already done for me.
2. Using your Exacto blade knife, place your template on the cutting board and carefully cut out each shape. I found that it helps if you have a copy of the original next to you while you're doing this so that you can remember which piece goes where in the end.
3. Now that you have your template cut out, place each piece on the appropriate sheet of decorate paper and trace a light outline in pencil.
4. Grab your Exacto knife again and cut out your decorative paper shapes.
5. Organize the shapes in the final form to get an idea of where everything should be placed, then using a glue stick glue everything down in it's appropriate spot on your background paper.
6. Find a badass frame and ta-da!! C'est fini. I found that using the original Etsy shop dogs as templates, you will need at least an 8x10 frame to fit.


Friday, September 21, 2012

DIY Dog Leash

Make all the bitches jealous 

Did you like my dog pun? Ha...ha...

For all the doggy-obsessed readers out there like myself, this tutorial will teach you step-by-step how to make your own custom dog leash for under $10! Inspired by the Etsy shop Downdog Duds

Time: 1 hour (depending on how good at sewing you are, this could be accomplished quicker)
Cost: Under $10

TOOLS & SUPPLIES
6 1/2 ft of 3/4" flat nylon webbing of your color choice (makes a 6ft leash)
6 1/2 ft of 3/4" ribbon of your color/pattern choice
Sewing machine
Thread

STEPS
1. Make sure your nylon webbing is approximately 6 1/2" long, cut if needed. Cauterize the ends with a lighter to prevent fraying. The cheapest place I was able to find webbing was at StrapWorks.com. They sell webbing by the foot for about 0.30 a pop in every and any color you could ever possibly imagine. Super cheap shipping, too! I chose to order the 3/4" flat webbing, but 1" width would also work fine if you like a thicker leash. You can also purchase your metal bolt snaps here as well for a relatively low price and can be customized to any color you like.
2. Whip out the sewing machine and grab your ribbon. If you chose to order the 1" width nylon webbing, I would recommend also ordering 1" wide ribbon so it lays flush with the webbing. If your local craft store falls short of ribbon choices like mine, Fabrics.com offers a TON of super cheap discontinued ribbon. If you still aren't satisfied with your ribbon selection, feel free to order a few yards of your favorite fabric. Simply cut the fabric in 3/4" strips if you ordered the 3/4" nylon webbing or 1" strips for the 1" webbing. I chose to stick with ribbon because I find it difficult to cut a straight line and I wanted my leashes to be PERFECT. 
3. Once you have sewn the ribbon (or fabric) to your webbing, fold one end of the leash inward to make a handle. Before you sew it, make sure you have enough room to comfortably fit your hand inside the loop. Sew about 1" of the handle to the leash in an "X" pattern. You want to make sure that it's sewn nice and strong, it would be awful if your handle came undone while you were walking and your dog got away! If you're confused on how to sew the handle, grab one of your existing leashes and note how the manufacturer has the handle sewn.  
4. Slide your metal bolt snap to the other end and sew about 1" inward in the same "X" pattern as the handle. Once again, if you're confused on how to make the strongest sewing pattern, study an existing leash you may have laying around the house to note how the manufacturer has the bolt snap sewn on. 

VOILA! Perfectly adorable custom dog leash :)


Friday, June 8, 2012

Studded Business Card Case


For the badass business woman.

When spiked heels aren't enough, why not add spikes to your business card case?

Time: 15 minutes
Cost: $13

TOOLS & SUPPLIES
E-6000 craft glue
14 medium tree studs
Aluminum business card case


STEPS
1. Remove all of the screws from your studs. Discard the screws or save them for a different project.
2. Apply one drop of E-6000 glue to the bottom of each screw. Attach the screw to the side of the business card case.
3. Wipe off any excess glue and repeat step #2 until both sides of the card case are embellished. Allow to dry overnight and voila!

Thursday, June 7, 2012

Girl Next Door Floral Headband


Taking precious to a whole new level.

No one can resist flowers. No one.

Time: 1 hour
Cost: $10

TOOLS & SUPPLIES
1 ft of 1/2 inch to 1 inch wide ribbon
Scissors
Needle & thread
Two hair ties
Fake flowers


STEPS
1. Take your ribbon and measure the length around your head. The hair ties will later be used to fasten the ribbon together and make it stretchy.
2. Remove the flowers from the stems and hand sew each flower to the ribbon. I sewed mine close together to give the illusion of a real flower headband.


3. After all of your flowers are sewn on, loop your two hair ties together and sew them to the ribbon.


Taaa-daaaaa!!! Pop this baby on your head and you are officially adorable.

Thursday, May 10, 2012

Sculptural Copper Vase

Is that a photo from Dwell magazine? No sucka! That's my house! And I can teach you how to make your's look just as awesome with a sculptural copper vase of your own!

Time: 1 hour
Cost: $20 for five

TOOLS & SUPPLIES
Pliers
20ft of 1/4 inch copper coil (you can find this in the plumbing section of any hardware store)
Small vase
Hot glue gun & glue

STEPS
1. Use your pliers to bend and snap about a 2 - 2 1/2 foot piece of coil. It's up to you how long you want it to be, just remember the shorter the coil the smaller the sculpture.
2. Use your hands to shape the coil. Sit it on the table periodically to make sure it's balanced. The sculpture can be shaped however you wish, just make sure it will be able to hold your vase without falling over.
3. Grab the pliers again and gently twist a small opening for your vase to slide into. I had my scientist boyfriend grab a few test tubes from the lab for me to use on this project so my opening had to be pretty tiny hence the need for pliers. If you have a larger vase you might be able to just use your hands again. You want the opening to be large enough to slide your vase into it, but small enough that it holds it tightly.
4. For extra measures, grab the glue gun and place a small amount on the vase and copper coil to secure it to your sculpture.

Fini! The fun part about this project is that like a penny, the copper will change color over time making each piece even more unique.

Sunday, April 1, 2012

Urban Outfitters Inspired Sequin Curtain

I aplogize for the horrible photo quality. iPhone cameras can only do so much.

I recently moved and was super excited to buy this new shower curtain(don't judge me) only to find out that our shower has a glass door :(


I was in dire need of a tiny curtain to go above the kitchen sink in our new house. Unfortunately, most tiny kitchen window curtains you can find at the store are absolutely hideous. The solution? Use my beloved shower curtain design for kitchen curtain inspiration!

Time: 2 hrs
Cost: $15

TOOLS & SUPPLIES
Sewing machine
Fabric and thread of your choice
Hot glue gun and glue
Scissors
Sequin trim

STEPS
1. Measure your window opening and decide how much fabric you are going to need. I ordered a yard for mine just to be safe. You can get your fabric at your local craft store (most of the time) or order it online. I bought mine online at Fabric.com for about $5.00. It's also the plainest fabric out there so the more intricate and high quality fabric you go for, the more expensive it's going to be. Since I'm only planning on living in my current home for a short amount of time and highly doubt there will be another tiny window in my next home, I chose the cheap route.
2. Find a place that sells the skinniest sequin trim ever. I ordered mine online with my fabric but ran out (you're going to need like three yards of this stuff if your window is the same size as mine) luckily the Hobby Lobby down the street from my house had nearly the same kind and I was able to purchase some there without waiting.
3. Sew your curtain. Design Sponge has a lovely tutorial on how to sew your own curtains if you need help or you can watch step-by-step how to sew curtains on YouTube here.
4. Once you have your curtain sewn, it's time to make it sparkle. Decide how far you want each strand to be and cut a nice pile to save time. I wanted mind to have a whimsical feel so I chose to make each strand a different length. After you have a nice pile of individual strands of sequins, whip out your handy dandy glue gun and get gluin.

The final product will be somewhat delicate, so I wouldn't recommend washing this master piece. Enjoy!

Saturday, March 31, 2012

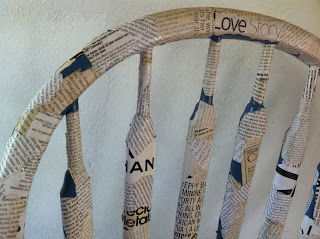
Modge Podge Office Chair

Grandma's office chair face-lift


Leg detail


Back detail


Time: 8 hours.
Cost: $9.00

If you have an old ugly chair and are equally tired of staring at that giant pile of ten million old magazines in the corner of your bathroom, this project is for you.

TOOLS & SUPPLIES
Old chair
As many old magazines and newspapers as you can find
Modge Podge

STEPS:
1. Find an old chair. It could be one at your house that you're bored with, or you can purchase one from the store like I did. Mine came from my local Betty Griffin House Thrift Store for around $3.00. Big spender, I know. After you have your chair- CLEAN IT! Especially if it came from a second hand store. You don't know where that thing has been, plus you want a clean surface to glue your paper to.
2. Get your paws on some Modge Podge or some other sort of glue. Elmers will work just as well, but modge podge works better because it puts a nice seal over the final product. Modge podge will run you around $8.00. Elmers, about a dollar. If you want to pinch pennies, I would recommend the Elmers.
3. Gather your magazines and begin ripping off small pieces of paper. I chose to make my chair mostly magazine text, but you can make it look however you like. Get creative and incorporate images from your favorite magazine's over the years if you like. It's all about forming a collage for the final product.
4. Once you have a decent pile of paper, begin glueing the the pieces on the chair. Apply a small amount of modge podge to the back of each piece and paste them on one by one. At the end, if you want to seal the chair you can cover the entire outside of the chair with modge podge to prevent accidental future water damage.

I found that this was a good project to work on gradually. I would work on it for about an hour a day over a week's time before I finally finished it. A girl can only glue so many pieces of paper to a chair before she starts to question reality. Regardless! This was a simple project that can easily be used to give new life to an old piece of furniture.