Saturday, March 31, 2012

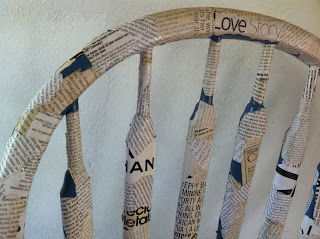
Modge Podge Office Chair

Grandma's office chair face-lift


Leg detail


Back detail


Time: 8 hours.
Cost: $9.00

If you have an old ugly chair and are equally tired of staring at that giant pile of ten million old magazines in the corner of your bathroom, this project is for you.

TOOLS & SUPPLIES
Old chair
As many old magazines and newspapers as you can find
Modge Podge

STEPS:
1. Find an old chair. It could be one at your house that you're bored with, or you can purchase one from the store like I did. Mine came from my local Betty Griffin House Thrift Store for around $3.00. Big spender, I know. After you have your chair- CLEAN IT! Especially if it came from a second hand store. You don't know where that thing has been, plus you want a clean surface to glue your paper to.
2. Get your paws on some Modge Podge or some other sort of glue. Elmers will work just as well, but modge podge works better because it puts a nice seal over the final product. Modge podge will run you around $8.00. Elmers, about a dollar. If you want to pinch pennies, I would recommend the Elmers.
3. Gather your magazines and begin ripping off small pieces of paper. I chose to make my chair mostly magazine text, but you can make it look however you like. Get creative and incorporate images from your favorite magazine's over the years if you like. It's all about forming a collage for the final product.
4. Once you have a decent pile of paper, begin glueing the the pieces on the chair. Apply a small amount of modge podge to the back of each piece and paste them on one by one. At the end, if you want to seal the chair you can cover the entire outside of the chair with modge podge to prevent accidental future water damage.

I found that this was a good project to work on gradually. I would work on it for about an hour a day over a week's time before I finally finished it. A girl can only glue so many pieces of paper to a chair before she starts to question reality. Regardless! This was a simple project that can easily be used to give new life to an old piece of furniture.

Friday, March 9, 2012

Wallet Savvy Wall Art

Baby shower savior


Time: 1 Hour
Cost: $12

Tired of looking at that hideous painting hanging in your living room? Just stumped on what to give to your friend for her baby shower? I give you: perfection.

Pinterest original inspiration.


TOOLS & SUPPLIES:
Art canvas or old painting
Acrylic paint & paint brush
Vinyl letter stickers
Map & staples (optional)

STEPS:
1. Find an old painting around the house or at a local thrift store and purchase one from there. Or go out and purchase a blank canvas. The canvas can have whatever you like on it, this is going to be the fill color of your letters. I chose to staple a map to a blank canvas because I couldn't find a painting I liked anywhere. Depending on the size of the canvas, this project can get expensive. My 10x10 canvas was $7 for a set of two at my local craft store. The map I found at the dollar store.
2. Decide what you want the letters to say on your canvas and stick 'em on. I did this project for my friend's baby shower so I chose to spell out her son's name. You can find the vinyl stickers at your local craft store for around $4.
3. Choose whatever color paint you want your background to be (for me it was white to give the piece a clean, fresh look) and paint over the entire canvas, including over the letter stickers.
4. Allow to dry for at least 24 hours. Gently peel off your letter stickers and you're done! Step back and admire your handy work. After you're finished with the project, keep your letters to reuse for future projects to really get your money's worth. If you're gentle putting them on and taking them off they can be used up to three times per letter.

Vintage Suitcase Pet Bed

Sans dog


Avec poochie!


Time: 3 Hours
Cost: $20

I found inspiration for this project through my daily browsing of Etsy. Check it out, they have some amazing suitcase pet beds on there!


Unfortunately they are also amazingly expensive. For example, this beauty above is $85.00. My DIY pet bed on the other hand, is not! Let's go.

TOOLS & SUPPLIES:
Suitcase
Power drill, screws and spacers (optional)
Hack saw
Plyers
Level (optional)
Craft stuffing or old pillow
Fabric
4" table legs (optional)

STEPS
1. Find your suitcase. I chose to use a plastic one so it would be easier to clean. Also, if I ever get bored of the color I can spray paint it. Use any old suitcase in your closet or a brand new one. I found mine at a garage sale for a grand total of....drum roll please...$1.50! Sha-zam! Make sure you clean that sucker good if you purchase a used one, god knows where that thing has been over the years and you can bet your poochie or kitty does NOT want to lay in a stinky bed. Or maybe they do. Regardless, YOU don't want a stinky bed in your house.
2. Dismantle the suitcase. I've seen pics of ones that people have left the suitcase together, but I was afraid it would accidentally shut on top of my dog and turn into a horrible death trap. Plus I personally think the beds look better without the top hanging open. Anyway, this is the most difficult part. Luckily I had my dad on staff to use his dad-like muscle skills to take the suitcase apart for me. To do this he used a hack saw to cut off the tip of the screws holding the two pieces together, then used a pair of needle nose plyers to pull the rest of the screw out of the hinge. Voila. Choose whichever side of the suitcase you want, I chose the bottom so that I could keep the handle detail. If you don't have a handle or just don't like it, you can always purchase a decorative one to screw on in the kitchen hardware department of Home Depot or Lowes.
3. OPTIONAL STEP: If you want to add legs on your suitcase pet bed like I did, find a nice set of legs (Oohh lala) and screw them on the bottom. I used the feet off of an old table I had simply because purchasing the from the hardware store can get expensive (try $8.00 per foot). To add the legs, drill a series of four holes, one in each corner, of your suitcase bottom. Attach the legs with screws and spacers. Don't forget to make sure the legs are level. Rockin & rollin is not a favorite pet past time.
4. In reality, this next step is optional as well. Now that your suitcase pet bed skeleton is complete, time to add the bedding. You can purchase a pet bed of your choice from a pet store or make your own. I found a trendy black and while chevron pattern on Fabrics.com that fit perfectly. This is also where the majority of the $20 total spent on this project went. Measure out the dimensions of your suitcase and get sewin'. For stuffing you can use an old pillow like I did or craft stuffing.

C'est fini! If your pet is afraid to get into the bed like mine was at first, use your buddy's favorite treats to lure him or her in and make it a positive place to be. Before long he'll love it so much you won't be able to get him to get out if it.

Thursday, March 8, 2012

Scrabble Drink Coasters!

Condensation rings beware!


Time: 1 hour
Cost: Free! (supplies on stock)

These lovely creatures are the result of too much free time and the black hole that is Pinterest. The photo above is actually the inspirational photo, my pic is a little less tasteful sporting the red solo cup below. This was probably one of the simplest and funnest projects I've done so far in my crafting career.

Pure class


TOOLS & SUPPLIES:
Hot glue gun and hot glue sticks
Cardboard
Scrabble letters from old board games

STEPS
1. Start by laying out what you want each coaster to say. Four letter words make the perfect coaster size and shape. I chose to go along with the cheesy drink references but feel free to choose whatever four letter words you like. Get creative! You may need to scrounge up more than one old Scrabble game from around the house. There are only so many vowels in one box. I was lucky enough to have two boxes of mix matched letters laying around which worked out perfectly. Depending on the words you choose to spell you may need more or less.
2. Lay your letters out on a piece of cardboard and trace a template. Use your new cardboard template to trace however many more coasters you want to create. This will be what is used to glue the Scrabble pieces to in our next step.
3. Whip out ol' reliable (glue gun) and get gluin'. I found it easiest to glue one letter at a time. Make sure your letters are flush so that the condensation from your delicious drinks you'll be drinking later doesn't drip down onto the cardboard and cause it to deteriorate.

That's it! Easy peasy pudding and pie. Pie, which would be awesome to serve at your Scrabble coaster release party when you're showing off your super cool crafts to your friends!

Monday, March 5, 2012

Ikea Inspired DIY Styrofoam Cup Lamp

BAM!


Time: 2 1/2 hours
Cost: $5

Ah yes, the classic white-on-chrome Ikea color scheme we've all seen so many times.


While the above ceiling lamp by Ikea will run you up to $90.00, my DIY table lamp inspired by this piece will cost you a mere $5.00!! Pretty snazzy, eh?

TOOLS & SUPPLIES:
Lamp base
Light Bulb
One 50-Count Package of Styrofoam Cups
Hot Glue Gun and Hot Glue Sticks

STEPS
1. Start gluing your cups. You can purchase these from the dollar store for..a dollar. This part can be messy (and painful) so if you have gloves I suggest wearing them. My glue gun tasted blood multiple times during this project. Trace around the outside of the bottom of the cups and make a thin line about half way up one side with hot glue. Attach another cup to this cup. It is very important to keep the cups flush with each other so that the piece looks professional. Be careful to make sure your glue gun is not turned up too high, or if you have a cold glue gun this is even better to keep from burning holes in the styrofoam as you work.

Eventually the cups will begin to create a spherical shape. Continue this process until you have reached the desired lamp shade size of your choice. Mine is actually only half a sphere and open in the back in order to make it easier to turn the lamp on and off.

2. Find a cheap lamp base at your local thrift store. I found mine for $2.00 at Goodwill. Attach your styrofoam cup sphere (or half sphere if you're like me) with hot glue to the base. Be generous, you don't want the shade falling off the base in the middle of the cool house party you're about to throw to show it off.

That's it! Simple. Screw in a fresh light bulb and invited people over to show off your fancy new lamp.

West Elm Inspired DIY Tufted Upholstered Headboard

Check out that craftsmanship.


Time: 6 hours
Cost: Less than $75

We've all seen them. The beautiful upholstered headboards like this one at West Elm.

So beautiful, yet so expensive. My wallet cringes at the thought of dropping 600 big ones on ANYTHING, let alone a silly piece of bedroom furniture that the boyfriend and the dog are the only ones that are going to see it.

That's when I though, hey! I'll make my own headboard! So for you good people of the Internet, here is a step-by-step tutorial on how you too can make your own gorgeous West Elm inspired upholstered headboard.


TOOLS & SUPPLIES:
1/2" Plywood
1x4" Lumber
Foam (at least 2" thick)
Fabric
Upholstery Thread
Upholstery Needle
Button Kit and Buttons
Scissors
Spray Adhesive
Nail gun and 1" Nails
Staple Gun and 1/2" Staples
Tape measure
Sharpie Marker


STEPS:
Step 1: Measure the width of your bed frame. The headboard should be about 1" or 2" larger in width than your mattress. The height is up to you. If you are planning on leaning against it while in bed make sure it is tall enough. Measure from the top of the mattress to the height you want the headboard to be. I chose to make mine 62" high and 62" wide to go along with the West Elm headboard measurements.

Step 2: Buy Your Supplies: You can buy plywood in large sheets and have the hardware store cut it to size. Buy your 1x4's and have them cut as well. Craft store foam can be expensive, so I purchased two 1" full size foam mattress toppers (the cheap egg-crate kind) from Wal-Mart and used to spray adhesive to glue the two against each other with the smooth side facing out. A lumpy headboard is not very appealing. When buying your fabric, be sure you purchase enough to wrap around the foam and staple to the back of the wood frame. If I remember correctly I used about three yards for mine and had enough left over in case of a craft emergency. Fabrics.com has a huge selection of discounted and discontinued fabric. I ordered a beautiful stone colored velvet from them for about $35. Their shipping is free if you order $30 or more and it's super fast! My fabric came in the mail in less than a week.

Step 3: Put It All Together:
1. It helps if you have a friend to lend a hand during the assembly process. Use your nail gun to secure the plywood to the 1x4 legs. If you've never used a nail gun before, it can be a bit loud but is actually fun!
2. Determine how many buttons you will use and where you want them to go (just a heads up the tufting was by far the most time consuming part. So if you don't particularly want a tufted headboard, I suggest skipping this step.) Mark the board with your Sharpie Marker and drill small holes; just small enough for the upholstery needle to pass through, this will help keep the buttons lined up.
3. Lay the plywood down and spray one side with adhesive and attach the foam to the board. Be sure you are in a well-ventilated room and have covered the surrounding floor with newspaper or an old sheet; this stuff is VERY smelly and VERY sticky (hence the name spray "adhesive".) Cut off any excess foam so that it is flush with the plywood. There should be no overlap. Allow to dry for 10-15 minutes.
4. Staple your fabric to the back of one side of your new headboard frame and pull taunt, staple to other side and repeat until you have covered the foam entirely.
5. Use the button covering kit to cover your buttons; this was another time consuming part. My fingers hurt just thinking about it. The button kit should come with instructions. Follow them!
6. Double thread your upholstery needle with upholstery thread and poke through one of your pre-drilled holes from the back to the front. Don't pull all the way through! You'll need the excess thread to tie your button securely. Make sure to leave some thread hanging out of the back. Slide the button onto the thread and poke the needle back through the same hole. Push the button on the front of your headboard into the foam while a friend tightly secures the thread on the back with a double knot. I found finding the holes when poking the needle back into the foam the most difficult part. Continue along until you have attached all of your buttons.

After that..voila! Take lots of pictures of your craftsmanship and make all of your friends who paid $600+ for their store-bought upholstered headboards jealous.